Hello, 2015!
This seems like a good time to complete all of those half-finished projects I started waaaaaay back in 2014. If you have been to our shop, All Things New Again in Leesburg, VA, in the past six months or so … you may have seen me working on this lampshade.
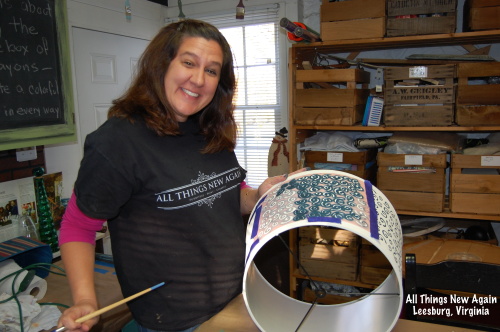
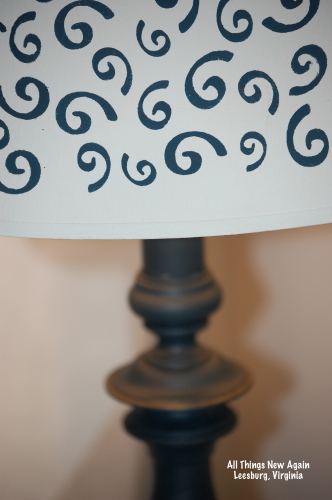
That stencil—with its 9,542,367 curly-cues—seemed like a really cool idea back in JUNE when I found it. After stenciling the first 4 curly-cues, I kind of lost interest and put the lampshade aside. I would work on it occasionally. My mom even offered to help once. But still, the curly-cues languished in Paint Project Purgatory. Customers would come in and see me working on it, then come back weeks later and ask if I finished it yet.
Um… no.
I am happy to announce:
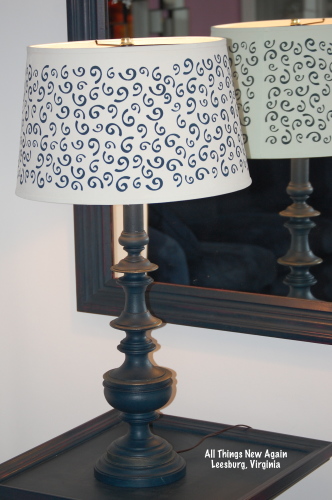
The lampshade is finished! Woo hoo!
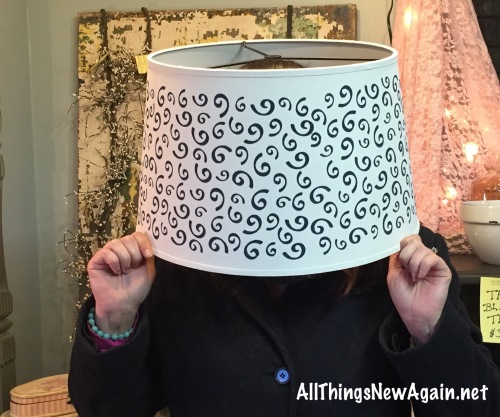
And so is the rest of the lamp.
(I even re-wired it—all by myself. It’s easy. You can do it too.)
2015 is off to a great start!
* * *
Here’s how to transform an old yard sale lamp and a cheap thrift store lampshade.
Or as I like to call this project:
Kiss Your Brass Goodbye!
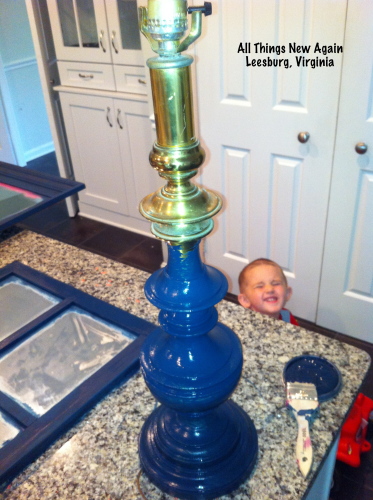
I found an old brass lamp at the North Carolina Route 301 Endless Yard Sale last June.
It had a cool shape. It was sturdy and solid.
It was also ugly and outdated.
That’s where American Paint Company all-natural clay chalk and mineral paints come in.
This stuff S-T-I-C-K-S—even to brass—no extensive prep work required.
To prepare the lamp, I wiped it off with a damp cloth and started painting. That’s it.
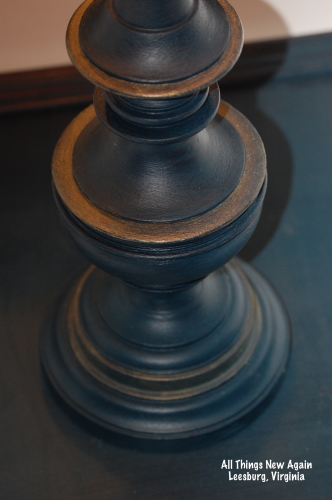
The color is my all-time APC favorite—a dark blue called Born on the 4th. This photo shows how nicely it covers the brass. This is the first coat. I let it dry completely and applied a second coat for complete coverage. I sealed it with American Paint Company Top Coat.
Then I ran into my first little roadblock to completing this project in a timely manner. I didn’t have a lampshade. The lamp didn’t come with one. I figured I would just buy a new lampshade and be good to go.
I ended up buying several new lampshades from several stores—and returning them all because they just didn’t fit right.
Then I found a lampshade at Goodwill that seemed the right size and shape. It also seemed a little … icky.
I bought it anyway. It was a perfect match.
I cleaned the lampshade vigorously with a lint roller to remove dust and little hairies.
It looked much better, but still didn’t look … fresh.
Again, American Paint Company came to the rescue! It sticks—nicely—to lampshades. Who knew?
This photo shows the “before and after” side by side. Big difference!
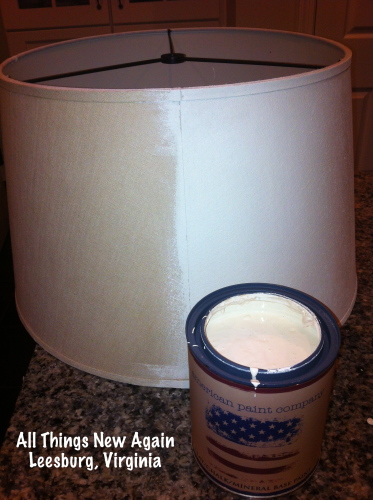
In person, the lampshade does not look like it has been painted. It just looks clean and white. When I tell people I painted it, they are surprised. I did not seal it because I liked the way it felt with just the paint. It kind of looks and feels like a blank canvas.
But it wasn’t blank for long!
I brought it to the shop to show my mom … and that’s when I found the stencil. The 9,542,367 curly-cues are the same Born on the 4th color to match the lamp base.
The stencil obviously did not stretch all the way around the lampshade. It also didn’t fit exactly since it is a rectangle and the lampshade is curved. I lined it up as best as I could, starting at the midpoint of the stencil and taping it down really well. I worked in sections, overlapping the stencil over a dry section of curly-cues so the pattern looks continuous.
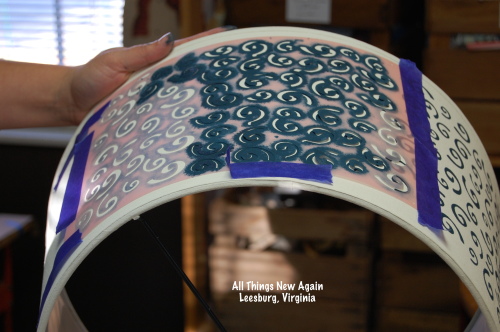
Holy moly! That was tedious, but I do think it looks really cool.
When I put the lamp and the shade together, I felt it needed a little more pizzazz.
(Subtle pizzazz, though. I didn’t want to compete with all of those curly-cues.)
American Paint Company carries a line of metallic micas that provided the perfect pinch of pizzazz for this project.
I mixed a little gold mica with APC Clear Wax and applied it around the lamp base with a small brush. I don’t follow a set formula with a rigid mica-to-wax ratio. In fact, I don’t measure at all.
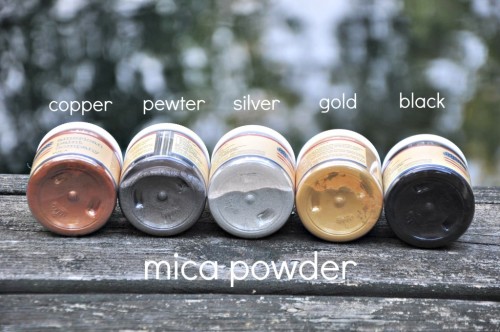
I just scoop some wax into a bowl, sprinkle in some mica and mix it together with a spoon. If it looks too sparkly, I add more wax. (Actually, I never do that. How can something be TOO sparkly?!) If I want more shimmer, I add more mica. There are no rules. It is a personal preference.
Your project—your bling!
HINT: You don’t have to use the entire wax/mica mixture at one time either. It will keep nicely in an airtight container. We rinse out those take-out salad dressing cups to store our mica at the shop. Just make sure the lid is on securely. It is nice to have pre-mixed mica on hand. Then you can just add a little here and there to projects as needed. As you can see here, I hoard every last smidgen of wax/mica mix and it lasts a long time.

Finally, I re-wired the lamp with a kit from the hardware store. The kit cost about $12 and included the “harp” piece I needed to attach the lampshade. (Kits are sold without the harps if you already have one. Harps are also sold separately if that is all you need.) The kit’s directions were easy to follow—even for someone like me who isn’t always great at following directions.
Here it is!
I feel so good about finishing this lamp … I just might be motivated to tackle something else from Paint Project Purgatory (AKA My Garage) for my next project!
Happy New Year!
~ Courtney

Nice work and great idea! Your energy is contagious…thank you.
Thanks Karen!
Thank you and we love this transformation too!
Good Afternoon,
i have just completed the first chair ( 5 more and a table to go). I have used the carbon paint and clear wax. The wax has come out a bit blotchy and there is actually a white residue in some areas. I used a cloth to put it on and bffed it as I went along and after it had dried.
Should I be using the brown wax? Or am I doing something wrong. I used the brown wax on a rust project and it came out just fine.
Thanks Debi
You may be using too much clear wax which will cause your piece to look blotchy and leave a whitish reside. You can wipe your piece down with denatured alcohol to remove the wax or try to wipe off the excess with a lint free cotton cloth. After the excess is removed, reapply a very thin coat of clear wax or dark wax and buff it to your desired sheen.