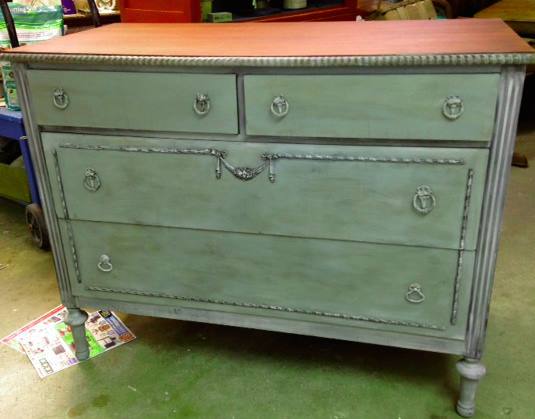


Step 6:
Paint and you are on your way! Here is the trim with my first coat of paint. If you did not know the difference it would be difficult to tell! Give it a try!


Clay / Chalk / Mineral Base Paint


Step 6:
Paint and you are on your way! Here is the trim with my first coat of paint. If you did not know the difference it would be difficult to tell! Give it a try!


American Paint Company offers an all natural, zero VOC, eco-friendly, and solvent free clay paint. Having made the cleanest, healthiest clay paints and finishes for the residential and commercial markets for the past 35 years, it was only natural to offer our products to the DIY market.
Our clay paints contain no acrylic, no fungicide, no co-polymers and no worries!
Discover the CREATOR within and grab a can of endless possibilities!!
Make time to CREATE with APC Clay Paints!
Copyright © 2024 • American Paint Company • Website by Oh, Hello Designs
Excellent info. I have a piece that I need to do the same thing with and have been toying with different ideas, but haven’t actually put any into action. This worked, so no need for me to try my ideas. Thanks again!
Question. You said that you made the new molded piece and left it overnight. Did you bake it also, like the mold, first? or was it only air dried? Thanks for the information!
It was baked for about 5 minutes and then let dry overnight.
Thank you so much. Somewhat labor intensive, but not nearly as much as I thought. I also have seen pre-cut, pre-made moldings at Hobby Lobby. But, I know they don’t match all. You did a great job and I’m so glad to have this as a reference.
awesome! I’ve not purchased some pieces just because trim was missing. Problem solved!
Thank you for showing me how to make appliqués!
What type product did you pour in mold??? I made a mold but need to find the product
to cast the mold.
Thank You,
Julia
Refer to step 5 in the blog post as to which product the artist used in repairing damaged furniture. There may be other products available in your area as well.
Wonderful Job! Have been looking & looking on the Internet for someone to show me how to do this! Thank you so very much! Ready to tackle my recent thrift store find with the same problem.
What type of paint did you use & how are you applying it?
I had already refinished my dresser before I noticed that a piece of trim was missing. Will WD40 affect the finish? I clear coated it in poly acrylic.
You need to contact the manufactures of WD40 and Poly Acrylic they may be able to help you. We do not manufacture either of these products and cannot determine their outcome.
Fantastic project! I love it! I have almost the same old cupboard at home. I am going to try to redecorate it like yours. Wish me luck. 🙂
Very helpful–thanks! What did you use to glue the new trim with?
Love this… what was used to glue the new trim onto the drawer with?? Thanks!!
I have a buffet that needs a piece of trim replaced on the door. The trim piece is very similar to the trim piece you replaced. However, my trim piece is curved. The doors on the buffet are curved. I didn’t want to spend alot of money on a custom replacement piece because the buffet was free. Any suggestions?
Thanks,
Carol S.
Hi
This is a great idea, but I have a mould for a dressing table that curves on the side do you think this would work for me ? Also what would you use to glue it on?
Regards sue