So you find a piece of furniture with good “bones” and great detail, the perfect piece for painting.
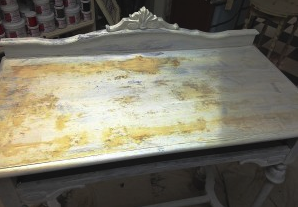
You choose a color and begin painting, but as the paint dries, you notice these awful spots bleeding through your paint!! What do you do?
Do you try another coat of paint, and another, and another, hoping it will cover? Well, guess what? You cannot cover up “bleed through” with additional coats of paint. It will keep bleeding through, especially when using a paint that is porous, such as a clay, chalk and mineral paint, a chalk based paint, or milk paint. You may think that using Kilz primer would do the trick, and it might, but a lot of times even that will not work. What looked like it had the potential to become a beautifully painted piece of furniture could possibly become something that you are ready to throw to the curb and give up. Read on to find out what I do to solve this problem.
The trick is to seal it off completely and then continue painting. Okay, “So what is the best way to do that?”, you may be asking. Let me share my experience with this happening to me and what has worked for me, so that you can end up with a beautifully painted piece that will end up looking like this…
My go to product in the past was to use Zinnser’s Bullseye Shellac, which works, but it took about 4 or 5 coats once when I encountered a piece that had really bad red color bleeding through from the old finish underneath.
This desk had been painted over the original stained finish, but as you can see, it was really rough and we thought the paint would go on smoother, if we sanded it smooth first. It did sand out smoother, but of course a lot of the original finish was exposed. I knew this was a really old piece and when I saw the old finish beneath the paint glaring at me, I suspected that I would get some bleed through, and boy, did I!! It was a mess!
So after that first coat of paint dried, I tried one of my products by American Paint Company that I had been told would stop bleed through. It is their Clear Top Coat.
It took two coats, drying between each coat and the coats dried really quickly, in about 10 minutes. Placing blowing air on it will speed this process even more. Once the second coat had dried completely, I continued painting with 2 more coats of Navajo White. I then sanded the entire piece, prepping the surface for a smooth waxed finish, then wet distressed for a subtle aged appearance, and finished with a dark wax.
Post courtesy of Tina

Lovely transformation. I’ll have to give Top Coat a try for bleed through.
Topcoat is a must have in every painters paint box – a quick and easy topcoat, great under wax for more durability, perfect medium to float mica or a tint into – LOVE IT!
Great suggestions and tips.
Love the idea of using Top Coat this way. I am working on a piece now with this very bleed through issue. I only have Hard Coat on hand now, do you think that would work too???? Snowed in 😉
Hard Coat would also be an excellent barrier. Good luck and send us pictures of your work!
Has anyone ever dealt with the knots on fresh pine bleeding through? I make a lot of my furniture from scratch, and am finding that even with a couple coats of top coat and or polyurethane that the knots are bleeding through after a couple months. Thanks in advance for any suggestions!
I agree with the previous solutions to bleed-through. Top coat or Poly it. If it is bare wood – you need to stain or seal it. The oils of the wood want to bleed through and not play well with natural paints. 🙂