The Ultimate Beginner’s Guide to APC – PART 2
STEP 2: DISTRESS
Using a clay based paint gives you the freedom and flexibility to get more creative with your furniture. There are several different techniques and ways to distress your furniture; which basically means to age the piece, or give it a vintage look and feel.
In this post of this guide, we’re going to share the 3 basic techniques that we’ve taught to thousands of beginners that are just starting out using American Paint Company products.
The best part about these 3 techniques, is that once you learn them, you’ll be able to use these techniques on several different types of furniture pieces.
Introduction to Distressing Furniture
When you ‘distress’ the paint on your furniture, you’re revealing the color underneath.
There are a couple ways of doing this:
- You can apply just a single coat of paint, and then distress the paint so that the original color of the furniture appears in areas where you distress.

- You can apply a couple coats of paint (or more), in differing colors, and when you distress in areas, the color you used on your first coat of paint will pop through.
Typically, you would only distress in areas where there would usually be ‘wear and tear’ on an old piece of furniture, but this is just a recommendation. You can do as much or little distressing as you desire.
There are a couple ways to ‘rub off’ the paint, allowing you to reveal the color underneath. One would be to rub off using a damp cloth. The other way would be to use a sandpaper. (although it’s a messier way of doing it).
A couple of problems may arise when attempting to ‘distress’ using a traditional paint, or a latex based chalk style paint, including:
- When a latex paint starts to harden, it essentially becomes hardened plastic. This can be difficult to distress and you might have to rub extremely hard, or do it very quickly before the paint completely dries.
- Trying to distress hard plastic causes paint to peel or chip. Most people will use sandpaper to distress latex paint, which can cause a big dusty mess.
The benefit to using a clay based paint to distress is that clay naturally and authentically distresses without chipping or peeling (because there is no latex/plastic within the paint). Even after the paint dries, you can simply dampen a wet cloth and begin distressing (even if it’s been 2-3 weeks!!).
So even if you want the modern, solid look, we recommend you try distressing with clay based paints. You might just love it!
Do I have to use the distressing techniques?
Many people prefer a solid, modern finish rather than mixing colors or applying distressing techniques. And this is totally okay! There is no rule that says you HAVE to distress your furniture. With clay paint, you’ll get excellent coverage if you want the solid look.
One thing to consider is that thicker clay paint will not leave a completely smooth surface like you’ll get with a latex based paint. But sealing your project with Top Coat or Vintage Antiquing Wax will still leave your project with a professional-looking finish. If you’re a perfectionist still looking for a perfectly smooth finish, you may want to consider using latex based paint.
That being said, there are ways to smooth out your project using clay based paint. First, lightly sand your piece to knock down any rough spots caused by the clay. Ensure the paint is completely dry before sanding down any rough spots. Next, after your paint has dried, dip your brush once more into the paint and then into some water. Apply a long, even brush stroke across your piece will smooth out the look. Once you seal your piece, you may want to consider one more light sand to knock down any of the rough spots remaining.
We encourage you to keep an open mind, play and experiment with the paints. Your project is not done until YOU say it is. So enjoy working with the paint, be yourself, and get creative!
Getting started with distressing
Here are the 3 top distressing techniques we recommend for beginners.
Wet Distress Technique:
- Paint one or two coats of paint as desired. You may use the same color or different colors for each layer.
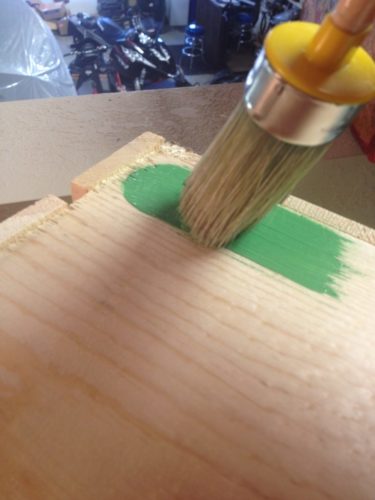
- Let it dry.
- Using a damp cloth, gently run to remove paint. Vary the amount of dampness and pressure for a more natural look.
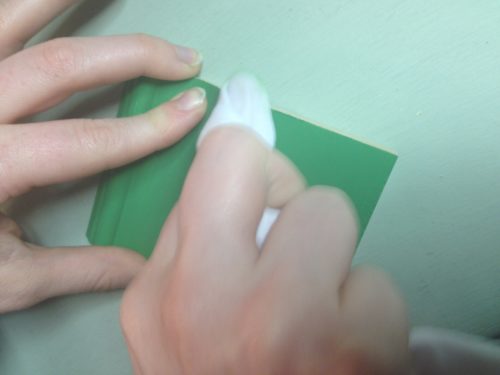
- Concentrate on distressing areas where it would naturally wear over time – edges, table legs, etc.
- When dry, apply Top Coat finish in a thin layer OR you can apply dark or Clear Wax (or both if desired) and buff off the wax.
Wet-distressed!
Sanding Technique:
- Complete steps 1 and 2 of Wet Distressing. Using medium to fine grit sandpaper, gently rub to distress and remove paint.
- Concentrate on distressing areas where it would naturally wear over time – edges, table legs, etc.
- Remove any debris and apply Top Coat finish in a thin layer OR you can apply dark or Clear Wax (or both if desired) and buff off the wax.

Distressed with sandpaper
Two Color Technique:
- Apply first color of paint and allow to dry.
- Apply a second color of paint and allow to dry.
- If you do not want the original color to show through, apply a barrier coat of Top Coat and let it dry before your first coat of paint is applied.
- Using a damp (not wet) cloth or rag, lightly rub desired areas to expose some of the underlying color. Use flattened rag in some areas and balled up rag in others.
- When dry, apply Top Coat finish in a thin layer OR you can apply Dark or Clear Wax (or both if desired) and buff the wax.
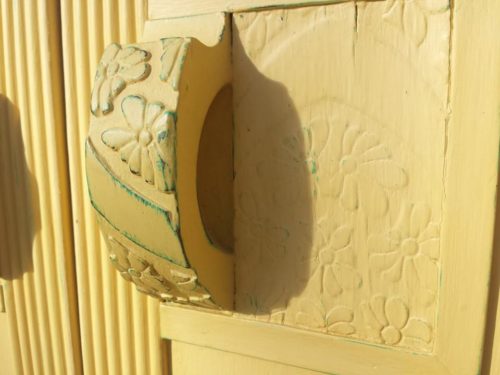
Born of the 4th/Liberty over Persimmon

Limoges over Cannonball
In the final post of this series guide, we’ll cover the importance of sealing your projects, different types of sealers and techniques you can use.

We Love to Hear From You